Ground dug WW2 relics are very rarely in an ‘as new’ condition. Only metal items made from the best stainless steel, or sometimes aluminium alloys, tend to survive intact after being buried in the ground for 75+ years. Brass also tends to survive quite well and rarely corrodes, but it does gain an aged patina and can sometimes become brittle. I virtually always leave this aged patina as is, as it adds to the history of the item, but with steel and iron, cleaning and restoration has to be done to prevent further corrosion and the ultimate complete loss of the relic.
With the Coronavirus lockdown into its 4th week here in the UK, and no way to get out and do any digging, (I tried my back garden but there were zero WW2 relics, just lots of rusty nails and bits of lead), I was cleaning the garage, (yep…..things are that desperate), when I came across a pile of 303 bullets I forgot I had. Back in June 2019 I recovered thousands of 303 cartridges from an old RAF base, (https://stephentaylorhistorian.com/2019/09/22/200000-cartridge-cases-500-bomb-fuzes-one-pit-the-video/ …… https://stephentaylorhistorian.com/2019/06/13/50000-ww2-cartridge-cases-one-pit/ ), and decided to do a bit of restoration. After all, using 100 or so of the 8,000 303 cartridge cases I had recovered means I still have 7,900 with their aged patina intact.
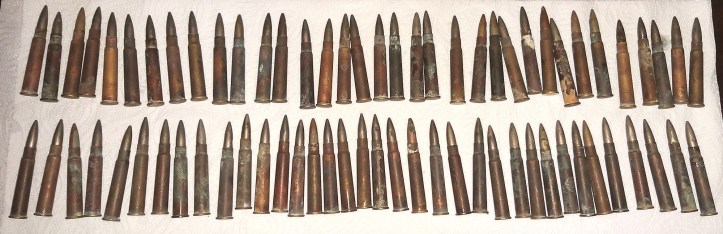
So, here is the result of the restoration. Not many pics in this blog but I will describe how I got them back to the state shown in the last picture.


The first step was to ensure that the bullets were a good fit for the cartridge cases. Once I had matched them together, I then removed each bullet, kept it with the cartridge case and inserted a small nail or screw into the cartridge case. Whilst all of them have been fired and the primers clearly struck, I decided to add the metal inside so that they rattled when shook. This means there is no doubt that they are inert and, as I was about to glue the bullets in place, important if I am ever asked to prove they are not live!
I used a two mix epoxy resin to secure the bullets in place, working on ten at a time. Reason for this is, when I started gluing them in place, I had mixed loads of epoxy and by the time I got to the 12th cartridge, it had already started to set, so I wasted half of what I had mixed! At least I was a bit more economical with the subsequent lot.
The next step in the restoration process is to clean the cartridge cases. They had already undergone some cleaning but, as you can tell, this was done to retain the aged patina. To get them back to shiny involves a couple more steps.
Firstly, I mixed citric acid crystals in boiling water, (about a 15% mixture), in a small bucket and plunged the now complete cartridges all in one lot in the solution. They were in the solution for no more than 2 minutes when I could see that all the mud and clay had been dissolved, and the brass had lost the aged patina. I immediately removed all the cartridges and rinsed them in cold water.
The only challenge you face when you use citric acid on brass is that, whilst it enables you to get the brass back to shiny, it dissolves the zinc in the alloy first, leaving behind a thin film of copper. This gives the brass an almost pink tinge which looks bloody awful. However, never fear! This pink tinge is easily removed.
The method I then used was to take a soap filled tough scourer, (Brillo pads or their cheaper alternatives)), and lightly scrub each cartridge. This removed the pink tinge, brought out the brass colour, and I was left with nice shiny cartridges. All that is left to do then is a final rinse and a dry.
The result is quite impressive I think…….

This process also reveals the headstamps very clearly. I had just randomly taken 100 cartridge cases from the pile of 8,000, so I was quite surprised at the number of different headstamps. The majority of the cartridge cases are either GB or CP, but there are plenty of others in there too.
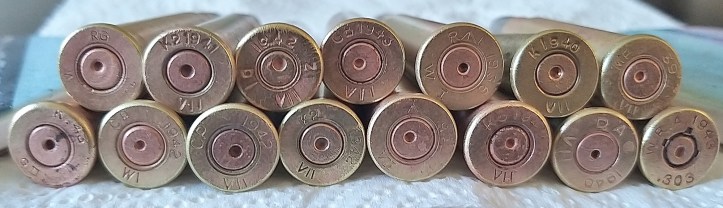

1 – Royal Ordnance Factory, Radway Green, Cheshire. 1943. Armour piercing
2 – Kynoch (I.C.I.), Standish, UK. 1941. Mk VII
3 – Defence Industries Ltd., Canadian Industries Ltd, Park Avenue Plant, Montreal, Canada. 1942. Mk VII. Nitrocellulose fill
4 – Greenwood & Batley Ltd, UK. 1943. Mk VII
5 – Royal Laboratory, Woolwich, England. 1936. Armour piercing Mk 1
6 – Kynoch, (I.C.I.), Birmingham, England. 1940. Mk VII
7 – Small Arms Ammunition Factory No. 1 Footscray, Australia. 1939. Mk VII
8 – Kynoch, (I.C.I.), Birmingham, England. 1943. Tracer Mk II
9 – Crompton Parkinson Co. Ltd, Doncaster, Yorkshire, U.K. (C-P). 1942. Armour piercing Mk 1
10 – Crompton Parkinson Co. Ltd, Guiseley, Yorkshire, U.K.(CP). 1942. Mk VII
11 – Kynoch (I.C.I.), Standish, UK. 1942. Mk VII
12 – Royal Ordnance Factory, Radway Green, Cheshire. 1942. Mk VII
13 – Kynoch, I.C.I., Kidderminster, Worcs.1942. Mk VII
14 – Dominion Arsenal, Québec, Canada. 1940. Mk VII
15 – Winchester Repeating Arms Co., Bridgeport, CT, USA. 1943. 303
Very happy with the results, and the variation in headstamps, showing this RAF base had used cartridges from numerous British manufacturers, as well as Australian, Canadian and US supplied cartridges.
Now to crack on and do another 150 or so, then get hold of a 250 round cloth belt and load ’em up!

Thanks for the great information. I live on what was RAF Clifton York, which also had the YARD, York Aircraft Repair Depot at one end of the runway. At the end of the war half the Halifax Bombers which survived were decommissioned here, broken up or turned into transports. I have 100s of parts which I will clean to look for part numbers. Some show part numbers already. The record breaking Friday The 13th was broken up here. I would love to find a recognisable piece of it. I am wary of finding dials which may still have the radium luminous paint on them. Can you please advise me of how to treat them if I find them. Any advice would be welcome. One unusual parts is the cover off a H2S radar destruction device, to be detonated to stop it falling into German hands if the aircraft was shot down. It still says Warning Detonators.
Regards Steve Paradine.
LikeLike
[…] blog post showed the results of my attempts at restoring some ground dug 303 cartridge cases, (303 cartridge restoration). The results were so good that I decided to take it a step further. Only problem was, I was short […]
LikeLike